(video )
"Each work grows, stays, decays – integral parts of a cycle.. ."
-Andy Goldsworthy
Grade 6 Art - Unit 1 "The Natural World"
(image credit )
Guiding Questions (Enduring Understanding):
Why is visual literacy important? What is art? Why is the intention of the artist important in our understanding of artwork? What is ephemeral art and why do artists work in this way? How can I produce temporal work?
Skills:
By the end of this unit, students will be able to:
(Pre-Tioman)
Develop their photography skills through the use of composition and the application of visual literacy Develop their knowledge on the visual elements & principles of design: line, texture, pattern, rhythm, movement, emphasis, contrast apply these to photography and sculpture apply these to land/ephemeral art
(Post-Tioman)
Create a flower ephemeral and record a sequence
Develop their iPhoto skills:
use of and application of contrast, cropping, duplicate, levels etc.
Setting up an album, sharing and leaving feedback through Picasa/Google
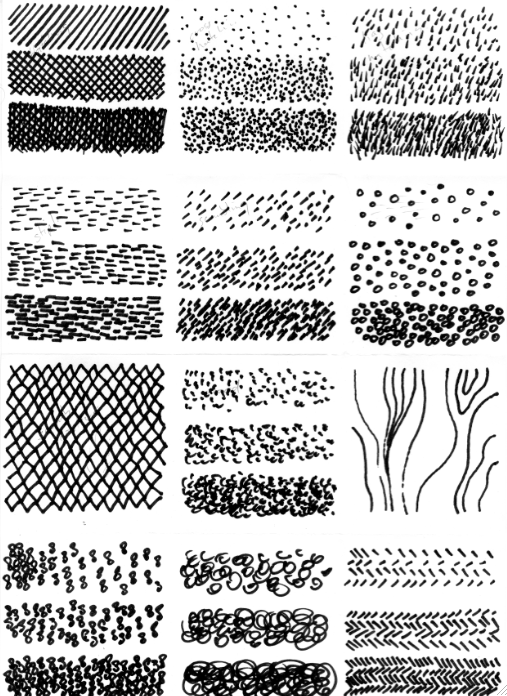
Develop their drawing skills: through hand eye coordination & direct observation through the effective use of line and tonal contrast close up linear drawing varying line weight gradation hatching cross hatching stippling
Analytical Writing:
Descriptive writing, comparison of 2 artists and use of specific visual language (elements/principles of art) Annotating images
Key Terms:
Ephemeral, composition, line, texture, pattern, rhythm, movement, emphasis, contrast, hatching, cross hatching, gradation, stippling, cropping, value, gradation
Artists to Consider:
Ephemeral Art: four characteristics of ephemeral art: time, communicative act, inherent vice and directive intent. Ephemeral art often involves works that do not exist in a steady state, but change or decay slowly.
Is street art ephemeral?
Andy Goldsworthy : a British sculptor, photographer and environmentalist producing site-specific sculpture and land art situated in natural and urban settings. Robert Smithson : an American artist famous for his land art. Christo and Jeanne-Claude : a married couple who created environmental works of art. Jim Denevan : works with natural materials to create massive scale drawings in sand, ice, and soil. Julian Beever : Street chalk artist, especially 3D illusions.
Ephemeral art images gathered on Pinterest here.
*note:
1 week will also involve the student outdoor education visit to Tiamon Island, Malaysia .
Lesson 1
Grade 6 Day 1 activity
Lesson 2
Arrange seating for students.
Review last week's drawings to critique.
*If going to Tioman next week, crash course on:
Ephemeral Art
Principles/Elements of Design
Photography (take several pictures and try from different angles)
Download the Tioman document here (Beach Art & Photography) if you wish: Tioman updated Art tasks pdf version 2013-14.pdf
*If not going to Tioman next week:
Whole Class Discussion: What makes a good drawing? Why? What skills or techniques are needed? (5-10mins)
[composition tricks, elem/princ]
Task: Drawing by s-l-o-w-i-n-g down (20mins)
Using an object (leaves, bark, an item from pencil case or room etc.), carefully draw what you see.
At this stage, do not worry about proportion etc. The important thing is to go slow and observe the object.
Draw what you see, not what you think it looks like.
You should be constantly looking at the object and what you are drawing in a 50-50 ratio.
Use pen so you do not need to worry about erasing. Fill the paper.
Small group discussion (5mins): In your sketchbooks and with your group, discuss and document via brainstorm "What is art?"
Accept all possible answers at this stage. Please date and write neatly. Be prepared to share your answers with the class.
Watch the following video on artist Jim Denevan . Jim Denevan is an artist that uses the natural environment as his canvas.
For example, he may use sand to create his works of art.
After the video, discuss the following in groups: Do you think this is art? Why or why not? Discuss in your groups.
In different groups, look at the following works of art by Andy Goldsworthy . Discuss the 3 questions below in your group. (5 mins)
This type of art is called ephemeral art. View other examples . What do they all have in common? In your opinion, what is ephemeral art? You will be creating ephemeral art whilst in Tioman.
Whole class discussion:
Are there any rules to help us create and evaluate art?
What can we look for? Gr6 Elements-Principles of Design
Why is visual literacy important?
Conclusion: With your group, write a newspaper headline (headline task info ) that captures what ephemeral art is, or an important aspect of it.
**First group go to Tioman week 3
Lesson 3
Arrange seating for students.
Warm-up: (Option 1) - 10mins in pencil Warm-up: (Option 2) Continuous Contour Line Drawing (10 mins) (with pen)
Draw the following pictured egg.
*Teacher will have to project on the screen or provide photocopies.
Pay attention to shading and gradation (blending of light to dark).
Start lightly and build it up.
Please title and date your work. Your drawing should fill half the page.
( photo source )
Choose an object to draw from your pencil case.
Flat rectangular objects and pencils are not good choices.
A Continuous Contour Line Drawing is an exercise to help us focus on observing the object & line.
Draw without lifting your pen from the paper.
Use pen so you do not need to worry about erasing mistakes.
Focus on looking at what you are drawing as much as the drawing itself and do not stop moving your hand when you look up.
Below is an example done with a portrait.
Discussion: View the artwork below. Address the questions as a whole class.
"Spiral Jetty "
Robert Smithson
1970
Material: Mud, Precipitated salt crystals, Rocks, Water
What Elements/Principles of Design were used in the work of art?
Drawing Task 1: Value Scale (20 mins)
Create a 7 value scale grid in your sketchbook like the one pictured below. Make each box 2.5cm
The first box on the right should be left completely white.
The first box on the left should be as dark as possible.
The next box should be slightly lighter, using less pressure.
The next box should be lighter still, transitioning.
The middle box should have medium pressure.
Keep going lighter on the following boxes.
NOTE: It is easier to add darker tones to the boxes than to try and erase.
An example is below:
Do this 3 more times with three different techniques from the slideshow or from the image below.
*Teacher may provide photocopies of the image.
Outline homework project task below.
Homework Project Task:
Using a camera, find 2-4 photos each that represent the following Element/Principle of Design:
Line Texture Pattern Movement Emphasis Contrast Refer to Gr6 Elements-Principles of Design
This will have to be done during your free time. This will be assessed.
Create a document with a table showcasing your photos and the element. Fit 3 elements per page.
You have 2-3 weeks to complete it (depending on when you go to Tioman).
Lesson 4
Arrange seating for students.
Warm-up:
Option 1 Option 2
"Value Your Pencil"
Using pencil, draw a square with an X in it as accurately as possible. (10 minutes)
Shade it as below using charcoal or pencil.
"Value Grid" (10 mins of drawing - 5mins assembling)
(Teacher instructions/prep)
You will be given a black and white paper.
Replicate what you see on the paper as accurately as possible in charcoal.
Pay attention to what you see and the different tones.
Drawing Task 1: *Formative Assessment - Shading & Gradation
Draw the following object in the classroom. (20mins)
If they are not available, find another object such as a leaf again to demonstrate your skill in showing texture, tonal value & gradation.
Use pencil and focus on shading and gradation.
Try to draw as realistically as possible. Try to avoid heavy outlines.
You should draw on a separate piece of paper. Give this to the teacher when complete for grading.
Drawing Task 2: Observational Drawing with Line Techniques (20-30 mins) in pen *Formative Assessment - Line Techniques
Find an object to draw from observation. Draw it from the angle you see it. Slow down and carefully observe.
Pay particular attention to your line weight (how hard/light you press).
Draw it as accurately as possible.
Add texture/value/gradation to your work through line techniques
You should fill the page.
You should draw on a separate piece of paper. Give this to the teacher when complete for grading.
Final Drawing Assessment:
You are an artist! You have been invited to participate in a group exhibition showcasing the environment.
You are required to create a drawing of a natural object. What could you draw? You should brainstorm a list.
You will be evaluated on effort & how well you draw:
accuracy & observation use of line (weight & line technique) tonal value (shading & gradation) View rubric here
You are permitted to draw realistically in pencil or use varied line techniques with fine line pen. Which do you prefer?
You should experiment, practice and show evidence of this in your sketchbook, before you begin the final piece.
This will be due the week before the October break.
You should also consider how you will frame your composition. Will you use emphasis? Balance? The rule of thirds? Could you even include repetition? What will be your intent as an artist?
You are permitted to work from a photo, but only if you photograph it yourself!
Your drawing will be approximately A4 size.
Have a look at some Gr6 Drawing Examples
View some line drawing examples here .
Students to be reminded of the Open Art Studio if they wish to work in class after school.
Homework Task: Continue with the photography assignment. Due next week.
Lesson 5
Collect photography assignment.
Students continue with their final drawing project.
Students to be reminded of the Open Art Studio if they wish to work in class after school.
Lesson 6
Arrange seating for students.
Task 1: Ephemeral planning
What ephemeral art could we create as a class?
What materials are readily available to us? What could we create?
Where could we display it? Could we document the changes over time?
Be prepared to create this next lesson.
Task 2: Students continue with their final drawing project. Due next lesson!
Students to be reminded of the Open Art Studio if they wish to work in class after school.
Lesson 7
Arrange seating for students.
Final Drawing Task due. Present & do a gallery walk.
Students should organise all their work/sketchbook and start the reflection
Select photos from 2013-2014


Comments (0)
You don't have permission to comment on this page.