If you are citizen of an European Union member nation, you may not use this service unless you are at least 16 years old.
You already know Dokkio is an AI-powered assistant to organize & manage your digital files & messages. Very soon, Dokkio will support Outlook as well as One Drive. Check it out today!
Unit Outline: Students are introduced to the line work of Van Gogh, Durer & Rembrandt and various other line techniques. Students create their own line drawing that shows shape, texture and tone.
*Composition must include a background, a middle-ground and a foreground using various line techniques, textures and tones in ink.
Students are evaluated on knowledge, process, participation as well as product.
Skills
By the end of this unit, students will be able to:
Use line to convey shape
Use line to convey texture
Use line to convey tone
Create a composition by combining various visual references
Knowledge
By the end of this unit, students will understand:
Line techniques
Value
Gradation
Composition
Assessment
Formative:
Art criticism (Criteria A) Due week 6
Research & Planning (Criteria A)
Summative:
Students will create a final, well planned line drawing to show shape, texture and tone that must include a foreground, middle ground & background (Criteria B)
Write a final self-reflection (Criteria C)
Artistic Awareness & Personal Engagement in class (Criteria D)
Approaches to Learning:
Thinking: generating ideas—including the use of brainstorming; outlining a plan
Reflection: self-awareness—including seeking out positive criticism, reflecting on areas of perceived limitation self-evaluation—including the keeping of learning journals and portfolios, reflecting at different stages in the learning process
Organisation: self-management—including personal goal setting and organization of learning materials
The Inspired Line is a video of an exhibit of Rembrandt and Durer drawings recently presented at UALR. The video was produced by UALR University Television.
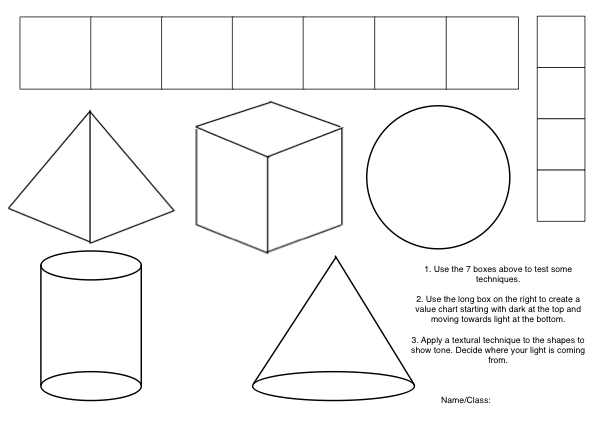
When complete, glue sheet into DWBs. Students to share work with peers.
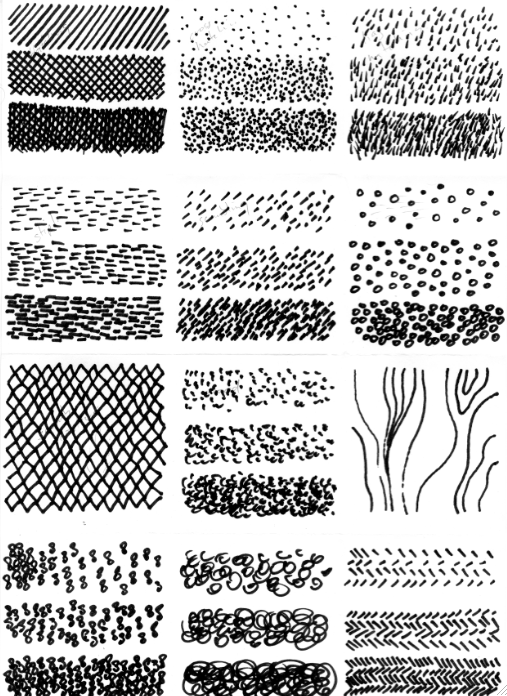
If printer or sheets are unavailable, simply make 3 columns with 5 rows in your DWB. Try to make:
Lines like ocean waves
Lines like rain
Lines like as clouds
Lines thin as thread
Lines round like buttons
Lines jagged as rocks
Lines like dots of snow
Lines like thread dotted with snow
Lines like the rings in a puddle
Lines like the stars shining at night
Lines like grass
Lines that fade out into the background
Lines like wood grain
Lines like a fuzzy sweater
Lines to show something is getting darker, or lighter
Discussion: How and what can we communicate with line? Meaning, what can line show or represent? Brainstorm as a group and record your answers in your DWB. Be prepared to share your answers as a class.
Introduce the significant concept: Line can be used to convey shape, texture and tone.
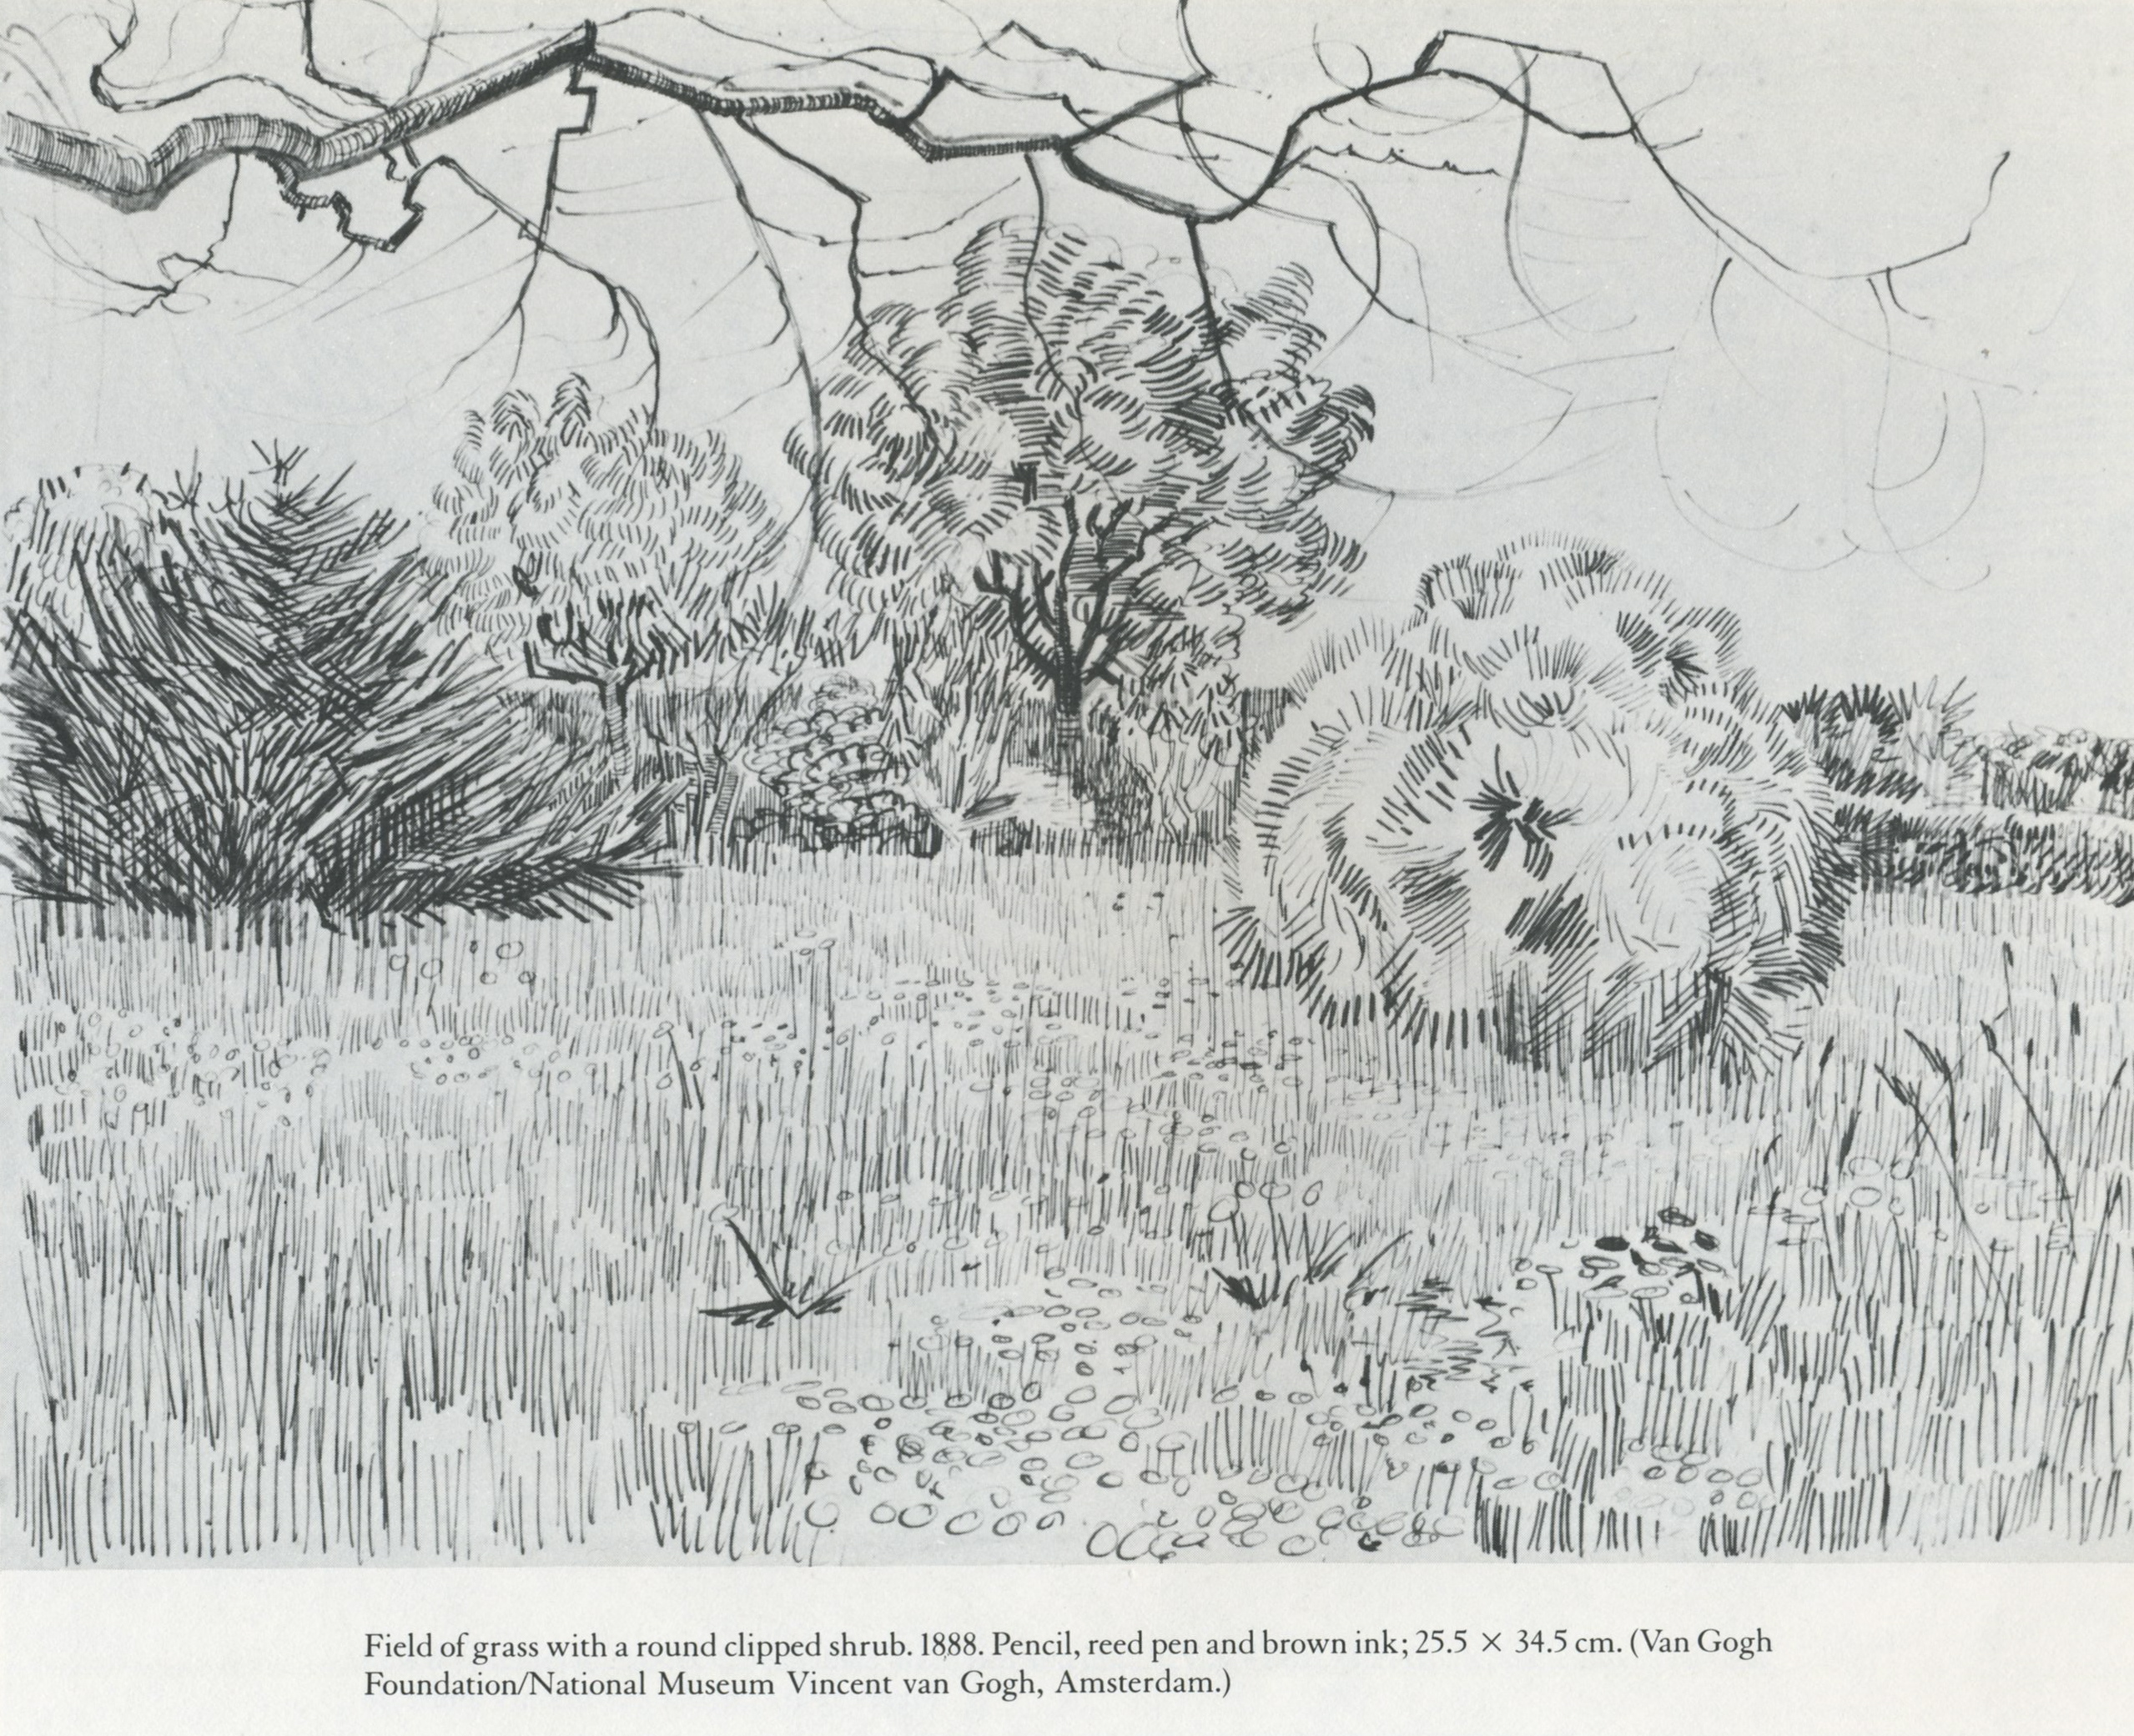
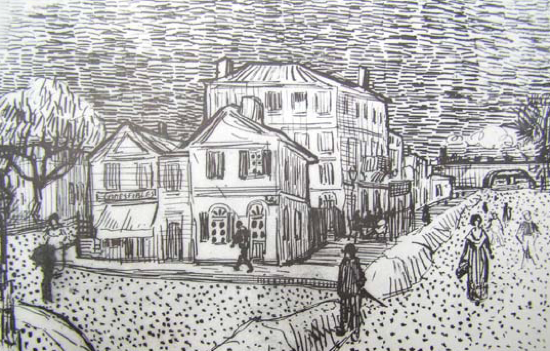
View the following line drawing by Van Gogh:
Discuss (students are encouraged to take notes):
What techniques were used with line?
How was texture created?
Do the direction of lines matter? Why or why not?
How is shape or contours shown?
How are shadow and light shown?
Why are lines varied (weight, length, direction etc.)?
Pre-assessment Task: Students to recreate one of Van Gogh's works in developmental workbook using pencil, or recreate various sections only (i.e. drawing 2 trees, 1 rock etc.). Van Gogh's line drawings here.
(Teacher Note: Students may need a demonstration on how to break the drawing down into parts)
When complete, students share work to discuss pros/cons, struggles/highlights etc. Notes from this mini-critique should be documented in Developmental Workbooks. Please date and title all entries.
Homework:
Complete the drawing started in class if not done so, as well as mini-critique. (Required)
Task: Have students practice drawing a landscape using various line techniques. This should include drawing trees, bushes and clouds with value. Students may use a landscape photo from Field Studies or search for something like this: http://www.flickr.com/photos/imrickndakota/1381604761/
*Students should pay attention to different line techniques as well as gradation.
Homework: Students should complete drawing done in class. (Required)
Week 4 - Art Criticism
Review and critique homework. Students to create a mini-reflection on strengths, weaknesses, areas for improvement and/or goals.
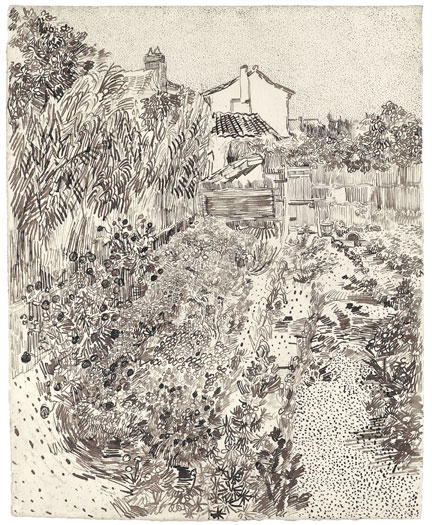
Compare and contrast the 2 works of art below:
Describe what you see in the 2 works of art
Interpret what is happening in the 2 works
Analyse how the works are organised (How is the work laid out? Where is the horizon line? Is the focus on the foreground or background? etc.)
Judge what you think about the artworks
What are the similarities and differences between the 2 works of art?
Albrecht Dürer, The Nativity (1504) & Vincent van Gogh, Cottage Garden (1888)
Students are to write an art criticism comparing and contrasting 2 landscape line drawings from Durer, Van Gogh or Rembrandt. Students may select which to pieces to criticise.
Requirements:
Name & tutor group in header
Title: Art Criticism
Paragraph form with an introduction, body & conclusion
Include photos and reference works (Artist, title, medium, year)
Reference where photos taken from (i.e. web address). Use bitl.ly or tiny.url to shorten the weblinks
200-300 words
Typed
Organisation:
Paragraph 1: Introduction
Paragraph 2,3,4: Similarities, Differences, Judgements etc.
Paragraph 5: Conclusion
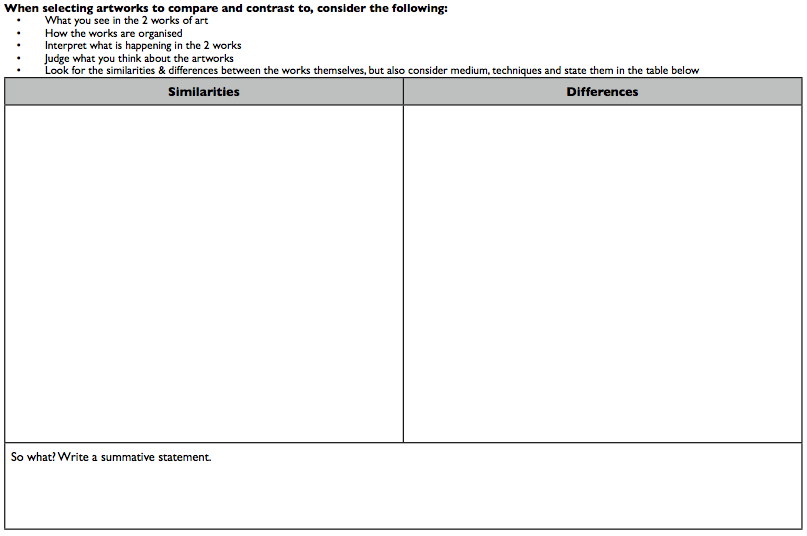
What can you consider when comparing and contrasting?
What you see in the 2 works of art
How the works are organised
Interpret what is happening in the 2 works
Judge what you think about the artworks
Look for the similarities & differences between the works themselves, but also consider medium and techniques
Students may begin research. It is suggested students use this research template, but this is optional. You may simply take notes in your Developmental Workbook. Evidence of this must be shown.
Note and discuss the various line techniques in these works. Pay particular attention to the use of shadow and light and the direction and lengths of the lines. This helps demonstrate form, contour and distance.
Note how simple scumbling was used for trees. Shadows are placed on foliage to create texture, shape and form. It is crucial to show the light, as much as the shadow. Trees will look better with short, scumbled lines rather than long continuous ones.
Students should attempt practice drawings to further develop.
Homework: Work on Art Criticisms. Due next class.(Required)
Homework: Students should complete thumbnail sketches. (Required)
Week 7 - Planning cont'd
Students should select their best thumbnail and decide which textural effects to use. Students are encouraged to practice this so they may begin work independently next week. Students may also collect drawing images from famous artworks to use as inspiration. For example, if you are going to include a tree, will you draw it like Van Gogh, Rembrandt or Durer?
NOTE: a common error students make is to either make a drawing too light or too dark, resulting in their work looking flat (no depth). Pay close attention to creating value in your work. This will greatly enhance it.
Homework: continue practicing line techniques for your final drawing.
Week 8, 9, 10 & 11
Explain to students how drawings will have elevated foregrounds and middle grounds and how this will effect their drawings. (This is a new aspect to the unit that is being introduced in the 2011-2012 school year).
Students work on final drawing.
Week 10: Have students write a mini-reflection on the progress they are making thus far.
Homework: work on drawing as required
Week 12 - Presentation & Reflection
Students present their work to class and write self-evaluations.
Write your reflection in paragraph form and include the following:
Write a brief introduction about the unit. Include the unit question and significant concept.
*write your reflection as if the reader has no idea what you've done.
Give an in-depth description of the progress you have made. You are encouraged to compare your first drawing to your final. Your progress could involve scale, composition, balance, line techniques etc.
Identifies areas for improvement. Be specific and provide detailed examples to support your statements.
Identify effective strategies to develop and improve your artistic processes. Artistic process includes learning various line techniques & applying various line techniques. It also includes your planning, your research, time-management and overall artistic skills. Be specific and provide detailed examples to support your statements.
When writing your reflection, you should consider your research, plans & drawing techniques.
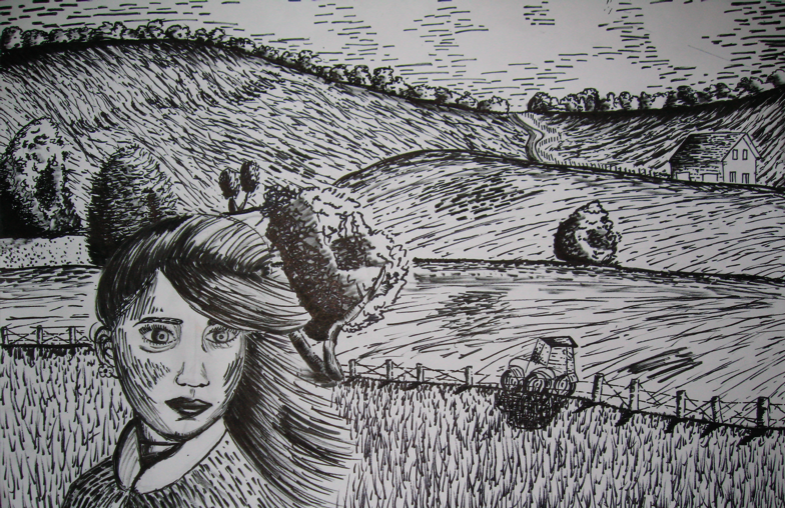
Student example of a written self-reflection here (also below):
Has the student addressed all the above criteria?
In Y.I.S. 7th grade art class, for past 10~12 weeks, we have been doing a line drawing of the our field trip destination (Hakuba)’s scenary. I combined google picture (Dog, and the Mountain) and the actual picture from the field studies (A boy, docks and lake. Our unit question was, “How can we communicate visually?” and significant concept is “Line can be convey shape, texture and tone.”
It took a lot of time to choose what kind of line will match my picture. So, I’ve tried many different types of techniques – light sources, scumble, hatching and cross-hatching. And I decided which techniques fit my scene the best. So, I think my line drawing had changed big time. Plus, to make my grades a bit higher for my project, I had made my own original lines and stipples and making my drawings more detailed. My sky includes staright lines, and a boring one dot in the middle of the line. But, what I did was that I made the line and dot closer to show that it’s the darker part. Plus, I used different types of markers. For the top part of the sky, I used a thick marker to show that it’s dark. Then, gradually, I changed the markers into thin markers to show that sky’s color is light.
I think I should not have brought the lake up. Only reason why I did it was because I made a mistake on the lake – I made a weird crossing lines. So, I thought that the lake would fail unless I hide it. So, I’ve decided to bring the lake up. One more imrpovement I think I could do better next time is not to make the mountain too dark. I bit failed on the shadows since I drew the line over and over again. Which gradually became darker and darker. Perhaps, if I haven’t done that, the mountain would be easier to see.
First of all, think carefully and deeply about the layouts. Check whether you want the forest to be in the horizon or not. And I did that. Second of all, do the first draft in pencil. I’ve done mountains, a boy, a dog, and docks in pencil. And I made it very detailed stippes, lines and made a different types of texture. Although, for some reason, I didn’t practise the lake in pencil. I just got a marker and made those cross lines. But, now I’ve learned those lessons, next time, I can be careful and do the draft in pencil.
I definitely think that my line drawing have gotten better then before. Although, I do think I was pretty good at first shot of line drawing. But, I only used the basic lines and stipples. My first line drawing was the scenary of Van Gogh’s neighbour… By Van Gogh. The balance of the human and the building was a bit off, but other than that, I think I drew pretty impressively. My second drawing was a scenary in Thailand or Malaysia. Now for this one… I have to admit: I rocked it!!! That time, I used varieties of lines and dots. Also, I’ve made the leaf look like leaf by making it as diagonal and crooked spiked line.


Comments (0)
You don't have permission to comment on this page.