THIS PAGE WILL BE UPDATED FOR THE 2011-2012 ACADEMIC YEAR
Project idea:
Create a Local's Guide to Your City
Terminal from Handmadefont on Vimeo.
http://sessions.tutsplus.com/creative/category/graphic-design/
Shigeo Fukuda
Unit Objective: To design a graphic that visually communicates a message.
Students are evaluated on knowledge, process, participation as well as product.
*lessons and assignments may be subject to change
You may also view and download the above unit pack online here.
Tutorials for Photoshop and Illustrator via MacLab (Special thanks to Mike Skocko for sharing!)
(scroll down on the page to view Photoshop and Illustrator)
Official Adobe tutorials here: http://www.adobe.com/designcenter/video_workshop/
Use these links to view other tutorials and to search for inspiration:
Week 1: Intro to Graphic Design
|
||||||||||||||||||
|
Task A - Group Discussion 1 Students will watch a few minutes of the video below.
In groups, students answer: What is graphic design? Record your answers and present to other groups.
Task B - Group Discussion 2 In groups, students answer, "What is the difference between art and design?" All students should record answers to present to other groups. Create a chart like this:
Task C - Group Discussion 3 In new groups students answer, "What makes good graphic design? What are the elements?" Record your answers through a brainstorm and a mindmap. Groups then share answers.
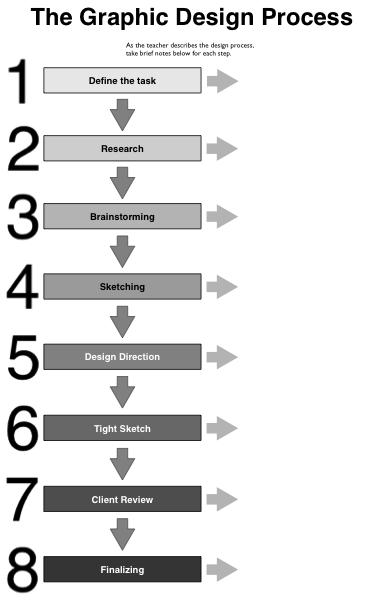
Task D - The Graphic Design Process The teacher will discuss the Grapic Design Process. On the handout provided to you (as below), take notes on each step. You can view the chart with notes in full here when complete.
Task E - Project Outline You will create an ad for one of the following:
To do this, you will use Photoshop and/or Illustrator. Your work may also include original artwork that is scanned in if you wish. You should consider font, colour, balance etc. Before you do this, you will be provided with a design brief and go through the design process. The design brief is your client's needs. If you wish to create your own, you will need permission from the teacher.
What is the difference between Photoshop and Illustrator?
Task F - Intro to Adobe Illustrator (LogoType) After following the tutorial, create 3-5 of your own type logos.
Homework:Required: Watch the following basic introduction to graphic design video and complete the worksheet provided to you that asks the following questions: 1. According to Robin Williams in her book, “The Non-Designer’s Design Book,” what are the four basic principles in design? 2. Summarise proximity in one word. What should you remember about using proximity? 3. What should you avoid when using alignment? 4. One repetitive element to use in a design could be a bold font. What could others be? 5. How is contrast created? (give examples) 6. Summarise what you feel is important to remember or to avoid when creating a graphic design. Now find examples for each principle in a newspaper or magazine. It is OK if one ad uses all.
If you have a slow internet connection, you can also view the presentation in 'powerpoint' style here.
Required: Browse this principles of design article. Browse Principles of Design
Optional: Watch this videos on the history of graphic design:
|
||||||||||||||||||
Week 2: Design Brief & Intro to Photoshop |
||||||||||||||||||
A) Review: Homework1. According to Robin Williams in her book, “The Non-Designer’s Design Book,” what are the four basic principles in design? 2. Summarise proximity in one word. What should you remember about using proximity? 3. What should you avoid when using alignment? 4. One repetitive element to use in a design could be a bold font. What could others be? 5. How is contrast created? (give examples) 6. Summarise what you feel is important to remember or to avoid when creating a graphic design. Now find examples for each principle in a newspaper or magazine. It is OK if one ad uses all. Students share examples they found from question 6 above.
*Rubric reminder
B) Design briefs outlined to students (view here). Students select project (see homework below).
C) Intro to Photoshop
Task: Creating a Basic Collage(You may find some photos to work with on the server: Student resources > HS Art > Gr9 Art Fndtn > Gr9AF Graphic Design > Scans for Photoshop collage)
Use Maclab's tutorials on Photoshop. IMPORTANT: you are encouraged to view several of these tutorials outside of class time as well. Use these links below to view other tutorials and to search for inspiration: Photoshop: http://artinspired.pbworks.com/Photoshop Illustrator: http://artinspired.pbworks.com/Illustrator
Homework:Required: Students complete the brainstorm section of their design process and begin the research stage.
Optional: 10 rules for making good design (via Presentation Zen)
A Guide to Creating Professional Quality Logo Designs
Design Process example for creating a logo from start to finish.
44 Gorgeous Watercolour Examples
|
||||||||||||||||||
Week 3: Illustrator (The Pen Tool etc) |
||||||||||||||||||
A. Students share research and brainstorm sections of their design process. (15mins)
B. The Illustrator Pen Tool(The following 3 tutorials are one but had to split due to size restrictions on YouTube.)
If time: Exploring the Pen Tool (part 1)
HomeworkRequired: Students begin creating thumbnail sketches for their design.
Optional: Want to know how to design? Learn The Basics.
|
||||||||||||||||||
Week 4: Project Sketching |
||||||||||||||||||
|
A: Students present their thumbnail sketches for feedback.
B: Students continue exploring Illustrator/Photoshop or begin the Design Direction section of design process. (See below)
Options (Choose tutorials below suitable to your preference or needs, or simply explore)
Illustrator:Continue exploring the pen tool and/or review the last video above in week 3. When complete, watch this video
Some great video tutorials on this site for review.
Within this site, check out the Pathfinder tool here. This is extremely useful for drawing with shapes etc.
This screencast covers fun with the Tilde key and Adobe Illustrator. Works with any Shape Tool, the Line Segment Tool, the Arc Tool, the Spiral Tool, and more. Use this technique to quickly make complex shape patterns.
Photoshop:Experiment! This video is interesting.
Explore brushes video (video tutorial via MacLab). This tutorial does not demonstrate drawing with brushes. It shows how you can use brushes to create swirls, leaves, custom shapes etc. Think of it like a random, well designed stamp tool.
Straightening & Cropping photos (video tutorial via MacLab).
Blending 2 photos (video tutorial via MacLab).
Blending 2 photos with masks, or, "I only want to merge a section from 1 photo" (video tutorial via MacLab).
Have a dark photo? You can improve it with the brush tool. Tutorial here. (video tutorial via MacLab). A more detailed but faster version of this tutorial is here.
Creating a Collage Using a Mask and Brush Tool in Photoshop
Photoshop tutorial on how to use blending modes for cool effects on backdrops. (it's done on a PC but not that different from Mac)
More on creating collages. (it's done on a PC but not that different from Mac)
Homework:Required: Students begin the Design Direction area of design process
Optional:
|
||||||||||||||||||
Week 5: Project Design Direction |
||||||||||||||||||
|
A: Students share the Design Direction area of design process for feedback.
B: Students continue using Illustrator/Photoshop or begin their Tight Sketch area of the design process.
6 techniques to extract anything from its background (Photoshop)
Homework:Students work on the Tight Sketch area of the design process either digitally of via paper.
|
||||||||||||||||||
Week 6: Project Tight Sketch |
||||||||||||||||||
|
Students work on their tight sketch digitally using Illustrator/Photoshop or via paper.
|
||||||||||||||||||
Weeks 7-9: Project Finalisation |
||||||||||||||||||
|
Students should begin finalising their design.
|
||||||||||||||||||
Week 10: Presentation & Self-Reflection |
||||||||||||||||||
|
Students present and reflect on their work.
|


 < From this to this >

You may also click here to go to the Flickr set page.

